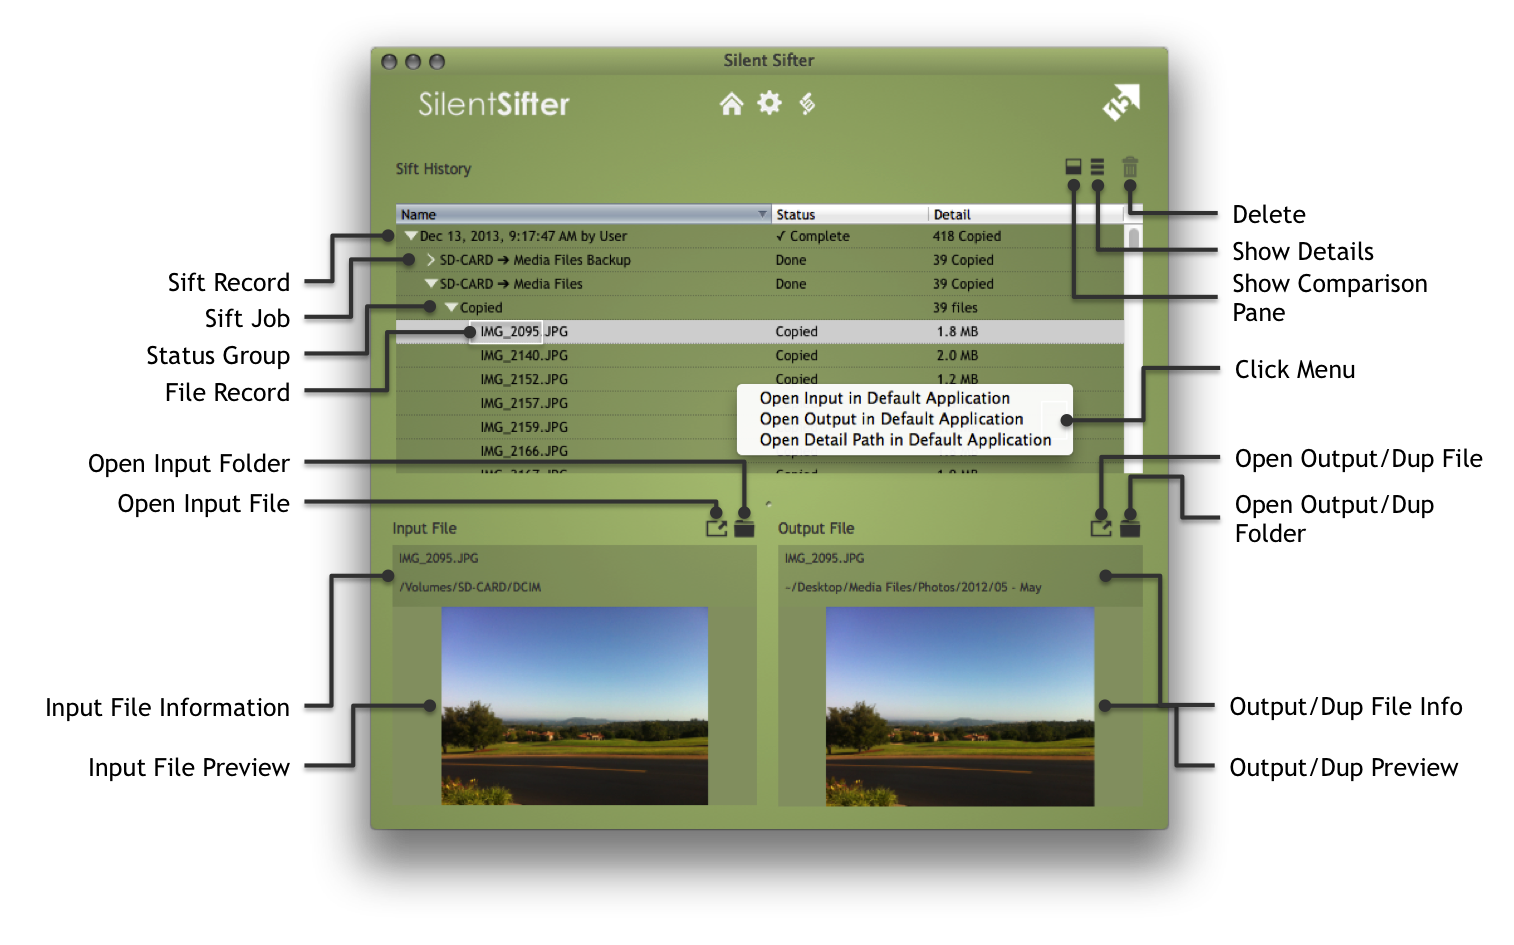
Using the history screen allows you to see what files have been processed in previous sift operations, how they were processed and why.
 |
Toggle Comparison Pane Show/hide the comparison pane for inputs & outputs. Learn more. |
 |
Show Details Show additional detail columns in the table. Learn more. |
|
|
Delete Delete the selected sift history records. Learn more. |
 |
Open File Open the file in the default macOS application. Learn more. |
|
|
Open Folder Open the folder in Finder. Learn more. |


About Deleting Sift Records
When you press the delete button, any selected sift records will be deleted. If no sift records are deleted, or if sift jobs, status groups, or file records are selected – nothing will be deleted.
The primary reason to delete sift records is to conserve disk space, as sift records can begin to add up.
About the Comparison Pane
You can visually compare inputs to outputs, and duplicates to each other using the split screen comparison pane.
Here are a few of the questions you can easily answer with the new pane:
- Did that file get copied properly?
- Is that file really a duplicate?
- Where is the file Silent Sifter says is a duplicate, and what does it look like?
- Which pictures were filtered?
The comparison pane is always closed by default.
There are two ways to show the comparison pane:
Option 1:

You can press the toggle pane button, which will show/hide the bottom pane
Option 2:

You can grab the pane divider at the bottom of the screen and drag it upwards/downwards
Once you have the pane open, select a row in the top pane to see the comparison. Keep in mind that what is displayed in the bottom pane varies based on what type of row you have selected.
Select an entire sift, and nothing will be displayed.
Select a Sift Job, i.e. DCIM–>Output Files, and you will see the name and location of the input and output only. There will be no image comparison in this case.
Select a file, and you will see the input file name, input file location, and image thumbnail for the input file on the left. Depending on the status of the file, i.e. Copied, Duplicate in Input, etc, what you see on the right side will vary.
Specifically, if the file was copied, you will always see the output file name, output file path, and output file image thumbnail. In the case where the file is a duplicate, you will see a preview of the duplicate file that was found. In the case where the file was filtered, or canceled before it copied, you will just see the input file.
Exceptions
Keep in mind that there will be times that Silent Sifter can’t provide a preview for a file.
This can happen for various reasons, which we will explain here.
Reason 1: OSX doesn’t know how to create a thumbnail preview
If you can’t see a thumbnail of the file in the finder, then you won’t be able to see it in Silent Sifter either. Instead, you will see an icon for the file type.
Reason 2: The file doesn’t exist anymore
This can happen for a number of reasons, but the most common will be with camera imports. When you import files from a camera, Silent Sifter stores them in a temporary folder, and when the sift is complete, cleans out that folder. This means that you won’t see a preview for the input files from camera imports.
Another way this can happen is if you are deleting or moving the input files after sift. If the file is no longer located at it’s originally sifted location, then there will not be an image preview.
Reason 3: Silent Sifter can’t access the file
In this case, the file still exists, and still is located at it’s originally sifted location, but there will not be an image preview because Silent Sifter is not permitted by OSX to read the file. This is due to security constraints that Apple requires from all apps in the App Store. Specifically, when you add an input or output to Silent Sifter, you are granting Silent Sifter permission to operate on files in those locations. Once you remove the input/output, we lose the ability to access those locations. That means that if you sift an input, then remove the input from Silent Sifter, you won’t see a preview image for those files.
Shortcuts

We’ve also added a few shortcut buttons to help you with your workflow, once you are comparing the files.
Specifically, there are two buttons for each file, which let you operate on the file.
The first button allows you to open the file in the default application. For JPG, this might be Preview, for MOV, this might be Quicktime, depending on your Mac’s configured default application.
The second button allows you to show the file in the finder. This can be useful if you want to delete/move, or otherwise operate further on the file, because it takes you directly to the file.
About Viewing Sift History While Sifting
Sift history can be viewed while a sift operation is ongoing, but only limited information about the current sift operation will be available.
Only the sift record and sift jobs will be displayed during sifting. Once the sift operation is complete, the sift history will automatically update to include status groups and file records.
About Detail Column Contents
The detail column in the table contains various information depending on what type of record is being shown, and what its status is.
For file records, it may include:
- An error message for files that failed to copy
- A file path to the duplicate file that was found
- The size of the file that was copied
For status groups, it will include the number of files within the job with the given status. i.e. Copied, 2 files, indicates 2 files were copied.
For sift jobs, it will include the status of that sift job during a sift operation, and the number of files copied and/or failed within that job once the sift operation is complete.
For sift records, it will include the status of the sift operation.
About the Click Menu
The history screen gives you the ability to right click or Control-click on a row, or set of rows, and choose an option from the click menu.
The options in the click menu operate on the input, output, and detail columns of the history table. Specifically, if the column contains a path, they allow you to open the default Mac OSX application for the file or folder at the path. If there is no path in the column associated with the menu option you choose, nothing will happen.
This can be helpful if you would like to quickly open a sift job’s input or output folder. Also, it is helpful if you would like to quickly compare input and output files, or input files with the file deemed as it’s duplicate.