Using the configure screen will allow you to add the inputs/outputs you want via buttons and menus. You can also use Drag and Drop on this screen by dragging and dropping various inputs/outputs onto the input locations or output locations lists.
|
|
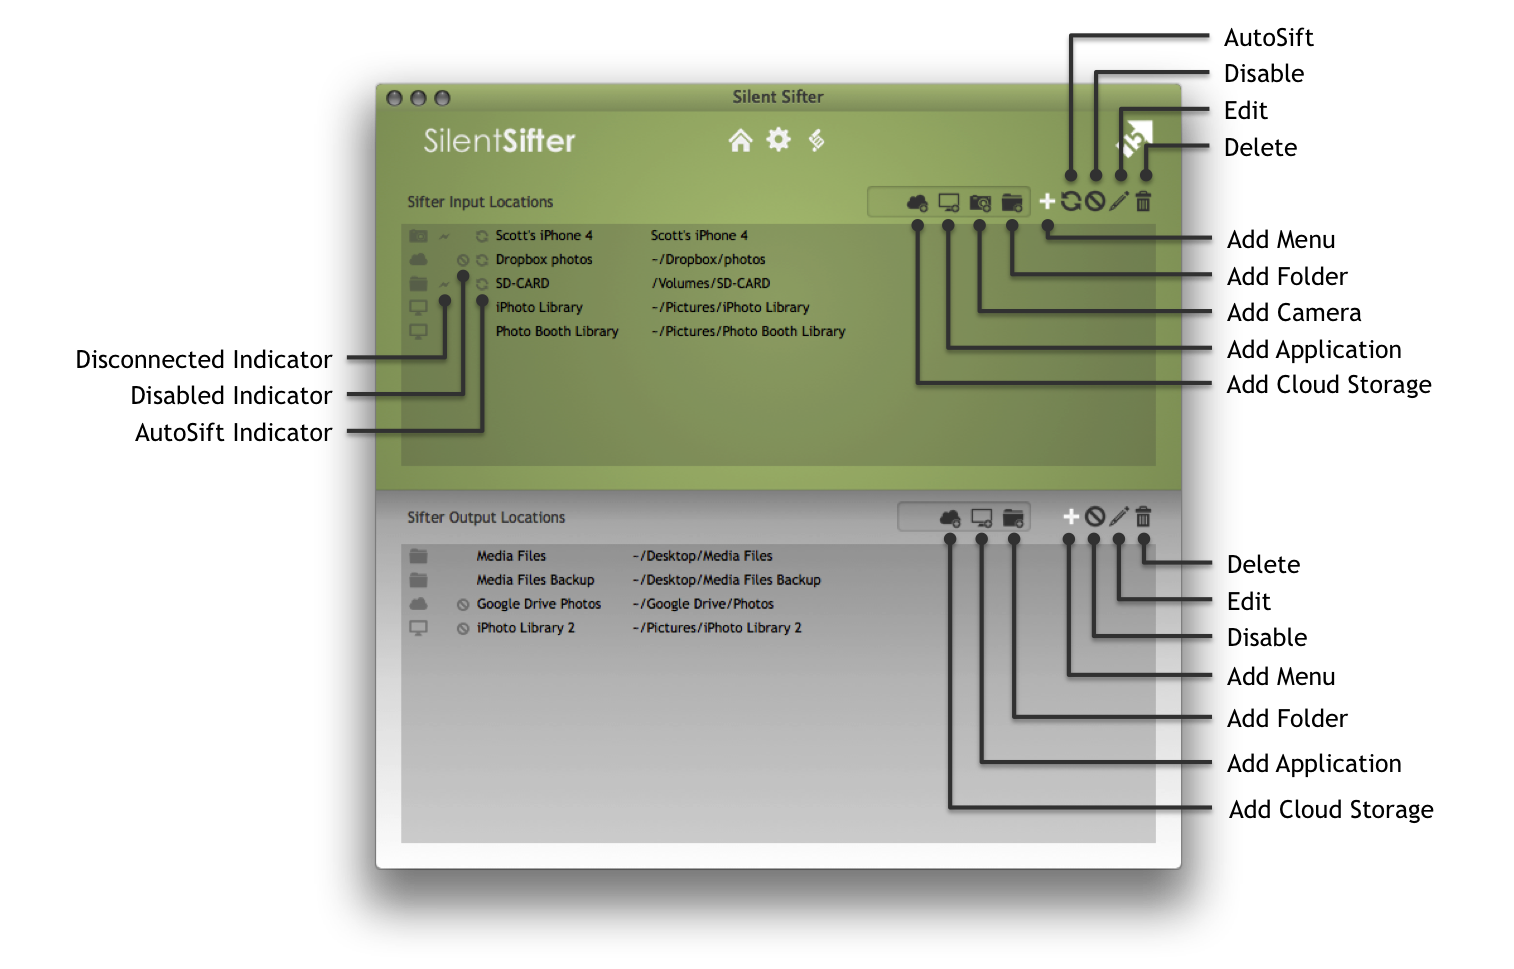
Add Menu Show the button menu for adding new input or output locations |
|
|
Delete Delete the selected input or output locations from Silent Sifter |
|
|
Edit Perform advanced configuration of the selected location |
|
|
Disable Disable or enable the selected locations for sifting |
|
|
Add Folder Press this button to add new folder(s) as an input or output. |
|
|
Add Camera Press this button to add new camera(s) as an input. |
|
|
Add Application Press this button to add new desktop application(s) as an input or output. |
|
|
Add Cloud Storage Press this button to add new cloud application(s) as an input or output. |
|
|
AutoSift Disable or enable automatic sifting on the selected inputs. |
|
|
Disconnected Indicator Indicates that the input or output cannot be found by Silent Sifter |


About Drag and Drop

You can add new inputs and outputs by dragging them into the configuration screen.
If you would like to add an input, you drag the location into the inputs (green) area, and drop it. If you would like to add an output, you drag the location into the outputs (white) area, and drop it. Once you drop it, Silent Sifter will validate that it is an acceptable location, and then add it. If it is not a valid location, you will receive a notification.
You cannot drag media files directly into Silent Sifter at this time.
Due to restrictions in the App Store, you cannot drag more than one location into Silent Sifter at a time. If you drag more than one location into Silent Sifter, only the first location will be processed. If you would like to add more than one location at a time, you can do so using the menu buttons in the configuration screen, and then multi-selecting the folders/libraries you would like to add.
About Deleting Locations
When you press the delete button, all of the selected inputs or outputs will be deleted from Silent Sifter. This means that you will lose any configuration you settings you have created for these locations, including file renaming, folder structure, filters, etc.
You can select as many inputs or outputs as you want and press the delete button to delete them all.
About AutoSift
When you press the AutoSift button, all of the selected inputs will have AutoSift enabled or disabled.
When an input has autosift enabled, it will show the autosift enabled indicator on the configure screen.
If an input has AutoSift enabled, then Silent Sifter will attempt to monitor that input for changes, and will automatically sift that location to all enabled outputs when changes are detected. Silent Sifter needs to be running in order to AutoSift.
When an automatic sift is triggered, it will run in the background, and only notify you if any files are copied. You can review the automatic sift history in the same history screen as all manually started sift operations.
There is a delay between the time that a change is detected, and the time that AutoSift begins. There must have been no changes for ~2minutes before AutoSift will commence.
Two types of events will trigger an autosift of an input. 1) Connecting of an input, and 2) Detection of media file additions to an input.
Event type 1) Connecting of an input, applies to Cameras and volume mounted folders (SD Cards, external hard drives, network file shares, etc).
Event type 2) Detection of media file additions to an input, only works properly for Apple OSX formatted drives. This means that Silent Sifter may not detect media file additions on some network file shares and external hard drives.
Note: Event type 2) Detection of media file additions to an input, has been shown to work intermittently with Dropbox. This is related to how Dropbox monitors and stores files, which can occasionally result in Silent Sifter not detecting media file additions. This is usually corrected by restarting Dropbox, or restarting your Mac.
About Disabled Locations
When a location is disabled, either through the location menu or using the configuration screen, it will appear on the home screen as faded out and without any connecting line to the sifter, and will show the disabled indicator on the configure screen.
Once it is enabled again, the location icon will fade in and become connected to the sifter by a line on the home screen, and the disabled indicator on the configure screen will disappear.
About Disconnected Locations
When a location is disconnected, it will hot appear on the home screen, and will appear in the configure screen with a disconnected indicator.
Once the location has been connected, it will appear on the home screen, and the disconnected indicator on the configure screen will disappear.
About More than 5 Inputs or Outputs
Silent Sifter allows you to have unlimited inputs and unlimited outputs. However, the home screen can only show the first 5 inputs and the first 5 outputs, alphabetically.
Keep in mind that when you press the sift all button, all enabled inputs and outputs will be sifted, even if those inputs or outputs are not displayed on the home screen.